Table of Contents
This page has deprecated and will be archived. Please go to https://www.bitcraze.io/.
This page contains information about projects, applications and scripts for automatically piloting the Crazyflie using cameras from the host. The parts needed for controlling is split up in numerous scripts connected together using ZMQ.
Note Currently this is all pretty hackish. See the setup page for a step-by-step setup guide, hopefully it is pretty straightforward to setup.
Architecture
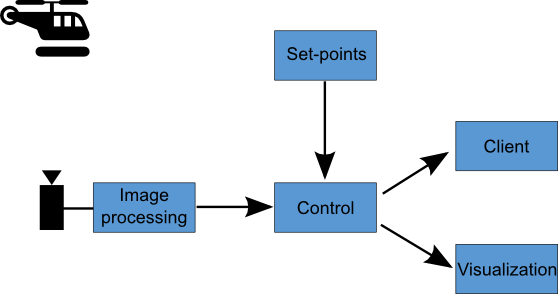
In order to be able to easily work with different steps of the piloting (like detection and control) the parts are connected together using ZMQ. This gives the benefit of easily stopping, changing and restarting parts of the chain without having to restart everything.
Currently there's 5 parts:
- Image processing: Find X, Y, Z and rotation
- Control: Control loops
- Set-points: UI for setting set-points
- Client: Connection to client for sending data
- Visualization: Debugging using grapghs
Parts
Image processing
The first step to controlling the Crazyflie is to detect its position and angle. For this a camera can be used, currently we are using the IR/depth sensor on the Kinect 2 together with markers. The output of this step is the X/Y/Z coordinates in meters as well as the angle in degrees and weather or not the Crazyflie is detected.
Fields in ZMQ message:
| Field | Type | Unit |
|---|---|---|
| pos | list of floats (x, y, z) | Meters |
| angle | float | Degrees |
| detect | boolean | N/A |
Example of message
{
  "pos": [0.1, -0.1, 1.0],
  "angle": 35.2,
  "detect": true
}
Control
Once the position and rotation of the Crazyflie is know the control is used to correct the positional and rotational error from the set-point. Currently the Z axis has no position control, only velocity control (set to 0 m/s by default). By default the set-points are (x, y) = (0, 0), angle = 0 and velocity. The output of the control is the roll/pitch/yaw/thrust set-points for the Crazyflie.
Fields in ZMQ message:
| Field | Type | Unit |
|---|---|---|
| ctrl | Dictionary | N/A |
The ctrl dictionary should contain:
| Field | Type | Unit |
|---|---|---|
| roll | float | Degrees |
| pitch | float | Degrees |
| yaw | float | Degrees/s |
| thrust | float | PWM |
Example of message
{
  "ctrl": {
    "roll": 0.1,
    "pitch": 0.1,
    "yaw": 0.0,
    "thrust": 0.0
  }
}
Set-points
In order to do something more interesting than just hovering it's possible to send set-points to the control.
Fields in ZMQ message:
| Field | Type | Unit |
|---|---|---|
| set-points | Dictionary |
The set-points dictionary should contain:
| Field | Type | Unit |
|---|---|---|
| roll | float | Meters |
| pitch | float | Meters |
| yaw | float | Degrees |
| velocity | float | m/s |
Example of message
{
  "set-points": {
    "roll": 0.5,
    "pitch": -0.5,
    "yaw": 10.5,
    "velocity": 0.1
  }
}
Client
When the corrections have been calculated it's time to send them to the Crazyflie. This is done using the ZMQ input in the client. This will allow to switch between manual/automatic control while also getting feedback from the Crazyflie.
Visualization
In order to debug the control algorithms there's a basic graphing tool available.
Fields in ZMQ message:
| Field | Type | Unit |
|---|---|---|
| name | string | Name of controller for data |
| data | dictionary |
The data dictionary should contain:
| Field | Type | Comment |
|---|---|---|
| P | float | P contribution to PID |
| I | float | I contribution to PID |
| D | float | D contribution to PID |
| E | float | Error |
| SP | float | The set-point |
| OUT | float | The output of the PID (P, I, D summed) |
Example of message
{
  "name": "Roll",
  "data": {
    "P": 0.1,
    "I": 0.2,
    "D": 0.3,
    "E": 0.1,
    "SP": 0.4,
    "OUT": 0.6
  }
}
