Table of Contents
This page has deprecated and will be archived. Please go to https://www.bitcraze.io/.
Hardware
When I try to take off there seems to be no lift on one/or more motors?
Most of the time this is either due to the fact that there's dirt (like hairs) stuck around the axis of the motor between the motor house and the propeller or that the propeller is too close to the motor so there's friction between the two. If neither helps check that the propeller is attached in the right way.
I have broken motors/propellers/mounts can I get spare parts?
There's spare parts available at Seeedstudio
When I start the Crazyflie the red LED blinks 5 times and I can't fly it?
 During the start-up all the mounted sensors run a self test. If any of these tests fail, the failure will cause the red LED to flash 5 times. It is possible to see exactly what failed by connecting to the Crazyflie with the cf-client and open up the console tab.
The picture shows the console tab with no errors but when you have an error it might say e.g MPU6050: Self test acc Y [FAIL]. low: 0.300000, high: 0.949999, measured: 0.0. This example means that the accelerometer Y axis didn't pass the self test and is probably defective. It is possible to get 5 blink error also if the Crazyflie is moved to much during the self test, so try putting it on a sable surface before you power it on.
Another thing to try, if you get an accelerometer self test error with measured value 0.0, is to tap/bang it on the sides. E.g. use a table edge to tap/bang it against, and tap/bang the rounded corners of the PCB (where the LEDs are). This could in theory release the accelerometer lock-up. We have had several successful cases doing this and if you managed to fix it this way please let us know.
If anything of the above didn't fix it you probably have a broken sensor and the sensor needs to be replaced. Contact Seeedstudio customer support and they will help you out. You can also visit the forum and especially this thread.
I broke on of the PCB arms. Is it repairable?
Yes but we have no ultimate way yet. As the PCB arm don't carry any electrical traces it is only the mechanics that needs to be fixed. We are looking into the possibility to make a custom 3D printable mount that could attach witch glue on the PCB arm part that is left. This would be the easiest but we are not there yet. We have tested another method that works quite well. See below.
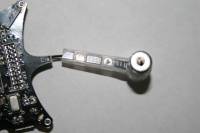
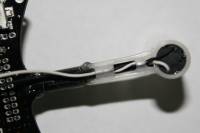
When the PCB arm breaks it almost always break as in the picture. Since there is a bit of it left it can be used to fix it.
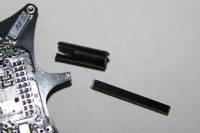
Here we have cut a piece of carbon fiber tube, inner diameter 2.7mm and outer diameter 4mm, to a length of ~12mm. Then we cut a slit ~4mm so that the tube can be pushed further in on the PCB. We used a dremmel to to this but other tools should also work. When the carbon piece is ready we glue it on with hot glue. An aluminium tube should also work well. Most RC shops should have this kind of stuff.
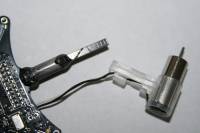
We fill the tube and glue the other piece in. Since it is hot glue you can use e.g. a candle or a lighter to heat it up when working with it so take your time to get it right. When done it should look something like the picture. Now cut the motor mount shorter. I cut it about 4.5mm shorter in the middle of the “circle” that can be seen from the top in second section.
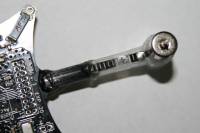
Then push the motor mount in and heat up the hot glue closest to it again so that it can be pushed all the way and glued at the same time. Then let it cool/cure while making sure it is in the right place and you should end up with something like in the pictures. This repair is lightweight and pretty strong and if it breaks again one can just heat it up to correct it.
Software
The radio reception is bad and/or I get a lot of Too many packages lost messages?
If there are other 2.4GHz devices (WiFi, Bluetooth, etc.) around there might be running on the same channel so try switching it in the bootloader configuration block. You might have to switch a few times fore you find a good one. You can also try adjusting the radio bandwidth. If you set it to 250kbit/s you will get good range outside but inside the reception/range might become worse. Since the rate is lower the data spends longer time in the air which increases the probability of interference. Changing the speed to 1Mbit/s or 2Mbit/s will give better results under these circumstances.
The radio connection is lost after a couple of meter no matter of the channel or datarate?
There has been at least one case of broken Crazyradio antenna. To check if it is your case test briefly the connection without the Crazyradio antenna installed, if the range is the same then your antenna is certainly damaged (do not try the Crazyradio without antenna for too long!). Try with another antenna (any 2.4GHz Wifi antenna would do).
I'm having strange problems with the sensor test not passing/motors not spinning/horizon not moving when connected?
Try to flash the latest firmware using the instructions and firmware downloads.
I upgraded the firmware on the Crazyflie and now it doesn't start
If you get errors during the upgrade or you upgrade to your own custom software that has bugs you might not be able to start the firmware. The typical behaviour for this during power on is that the red/gre LEDs blink and then nothing else happens. No sensor test is run (i.e no more blinking LEDs) and you cannot connect with the Crazyradio.
When upgrading the firmware the bootloader cannot be overwritten or modified so you always have the option of going into bootloader mode and upgrading the firmware again. Here are the instructions for upgrading the firmware.
I'm having problems entering the bootloader mode
Try the following steps:
- Power off the Crazyflie
- Un-plug and insert the Crazyradio again
- Start the cfclient
- Go to the menu Crazyflie→Bootloader and click Initiate bootloader cold boot
- Power on the Crazyflie (not using USB, only battery) within 1-5 seconds after initiating the bootloader
- Flash new firmware without the Verify option enabled
