Table of Contents
This page has deprecated and moved to the new documentation framework of the main Bitcraze website. Please go to https://www.bitcraze.io/documentation/system/
Overview
This page is intended to give an overview on how to use the Crazyflie client, not for installing it. For install instructions go here.
The Crazyflie client is used for controlling the Crazyflie, flashing firmware, setting parameters and logging data. The main UI is built up of a number of tabs, where each tab is used for a specific functionality.
This page uses the terms roll/pitch/yaw extensively. For that to make any sense for a quadcopter we need to know where the front is (Crazyflie 1.0, Crazyflie 2.0).
How to get flying
- Start up the application
- Insert the joystick and Crazyradio (PA)
- Before you connect to the Crazyflie make sure that the joystick is working as expected and that the thrust is zero. The joystick values should be visible in the flight data box under target.
- Press Scan
- Wait for the scanning to complete
- In the drop-down menu to the left of the Connect button select the Crazyflie you want to connect to. Connect to the URI e.g. radio://0/80/250k.
- The client will now connect to the Crazyflie and handshake
- When the handshake is done you can start flying the Crazyflie. Remember the most tricky part is the thrust so start out easy…
For more info on LED indicators etc. have a look at the Crazyflie or Crazyflie 2.0 user guide.
Main UI
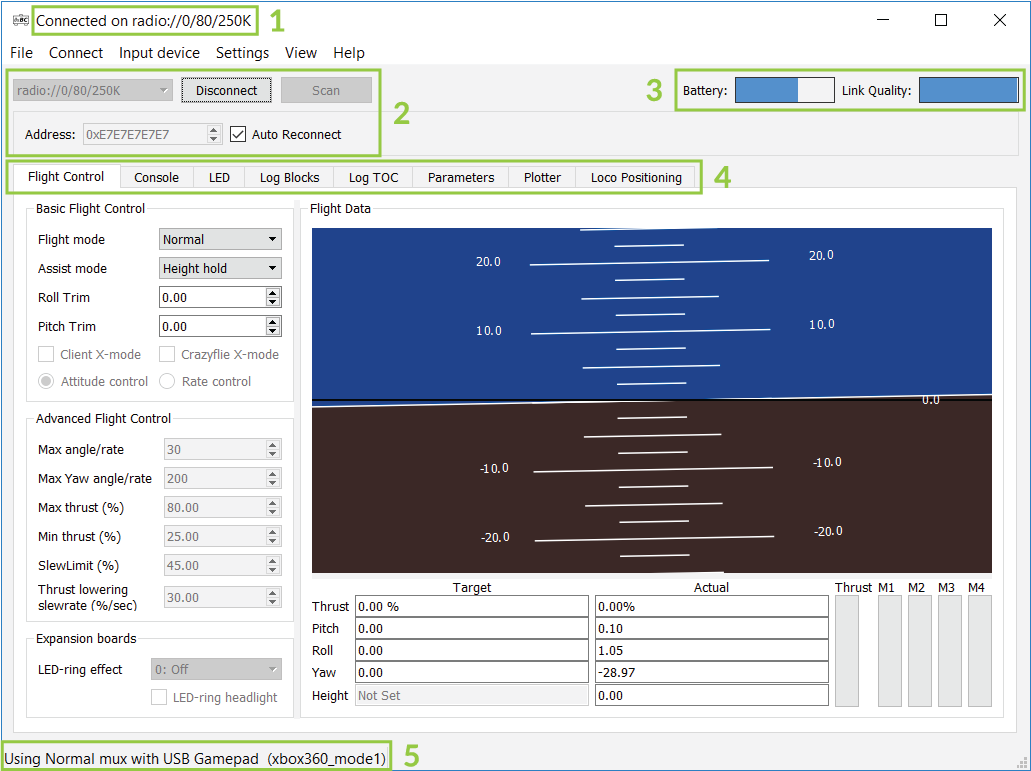
- The window title will show the connection status
- Connect/disconnect, scan and the drop-down connection list as well as Address and auto reconnect.
- Scan: Will scan for availible Crazyflies within the chosen address.
- Connect: Will connect to the selected URI in the connection list
- Disconnect: Will disconnect the current Crazyflie
- Address: The address to scan for. If you didn't change this in the configuration, then leave the default of 0xE7E7E7E7E7
- Auto Reconnect: Try to automatically reconnect when connection is lost.
- Battery and link quality (from 0% to 100%)
- Tabs with specific functionality (see below for details)
- The selected and used input interface
Functionality
Below are a few guides on how to accomplish specific tasks with the client.
Firmware upgrade
For updating the Crazyflie firmware there's the possibility to enter bootloader mode and flash new firmware from within the client. The bootloader mode is accessed from the menu Crazyflie→Bootloader. If there is any problem during the flashing or a wrong firmware is flashed the process can just be started again.
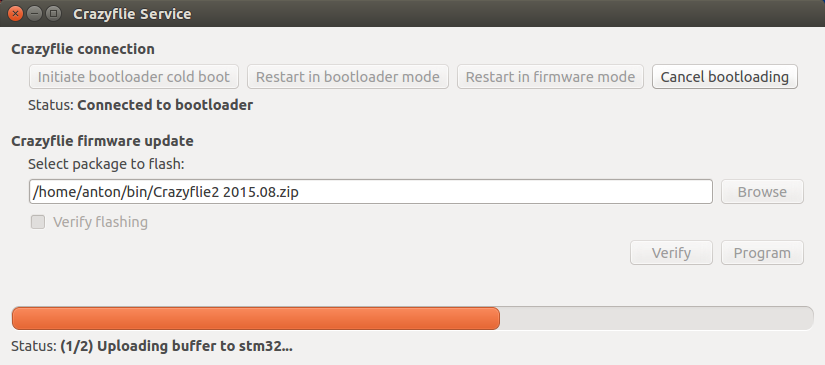
To update the firmware in the Crazyflie 1.0/2.0 do the following:
- Make sure that the Crazyflie is disconnected from the client and powered off
- Go to the menu Crazyflie→Bootloader
- For Crazyflie 2.0 hold the button for about 3 seconds when turning it on until the blue LED M2 starts to blink to get into bootloader mode. If a wrong nRF51 firmware has been flashed you might have to start from an un-powered state. Then hold the button and connect power.
- Click “Initiate bootloader cold boot”
- For Crazyflie 1.0 now power it on within 5 seconds using the battery (not USB), the booloader should now connect
- Press “Browse” and select the binary you want to download (e.g. cflie.bin). Note: A *.bin file will be flashed to the STM32xxx only. Or select a zip file containing firmware for both nRF51 and STM32F405 for Crazyflie 2.0 as well as firmware for the STM32F103 for the Crazyflie 1.0.
- Press “Program” and wait
- Press “Restart in firmware mode”
To check the firmware version, under the View menu, open up Tabs→Console tab and look at the output when connecting to the Crazyflie 1.0/2.0.
Firmware configuration
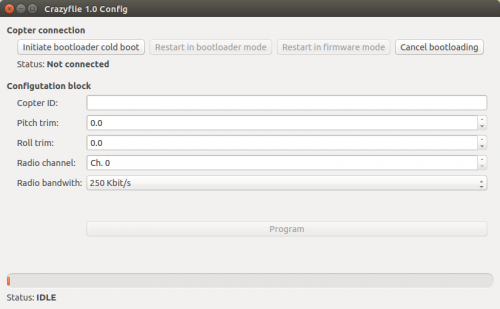
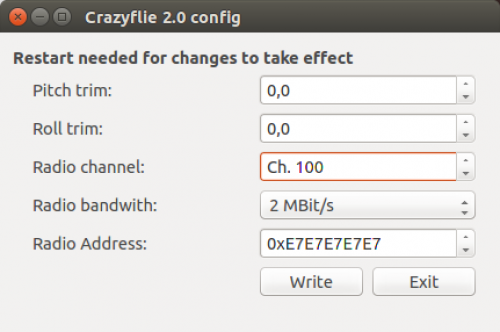
It is possible to set another channel to communicate with the Crazyflie 1.0/2.0. It can be wise to do this if there exist other wireless networks that can interfere, especially WiFi. It is also possible to permanently store the trim values for pitch and roll.
It is currently possible to change the following parameters which are stored in a none volatile memory:
- Pitch trim Can be programmed permanently with the trim values found to work good in the flight tab.
- Roll trim Can be programmed permanently with the trim values found to work good in the flight tab.
- Radio channel Can be set to anything between 0 and 125, correspond to a frequency from 2400MHz to 2525MHz. In most countries channel 0 to 80 is OK to use but this should be checked with you local regulations. If using 2M datarate, the copter channels should be 2 apart (2MHz).
- Radio bandwidth This can set the radio bandwidth to 250k, 1M or 2M. A lower bandwidth has longer range but has higher chance of collision. When used inside sometimes it is better to use 1M or 2M as it decreases the risk of collision with WiFi.
- Radio address (advanced) will set the shock burst address used for communicating. Note that if you change this then you will have to set the address correctly in the connect dialog.
The procedure is described below and the parameters can be changed again any time the same way.
Logging
The Crazyflie logging framework allows to log the state of Crazyflie variables in real-time. This subsystem is used by the client to show information like pose or battery level.
The list of log variable can be seen in the “log TOC” tab in the client.
Variables are logged in block: one log block is a list of variable that are logged at the same time. You can setup custom log blocks that can be plotted in the plotter and saved to file in the log block tab.
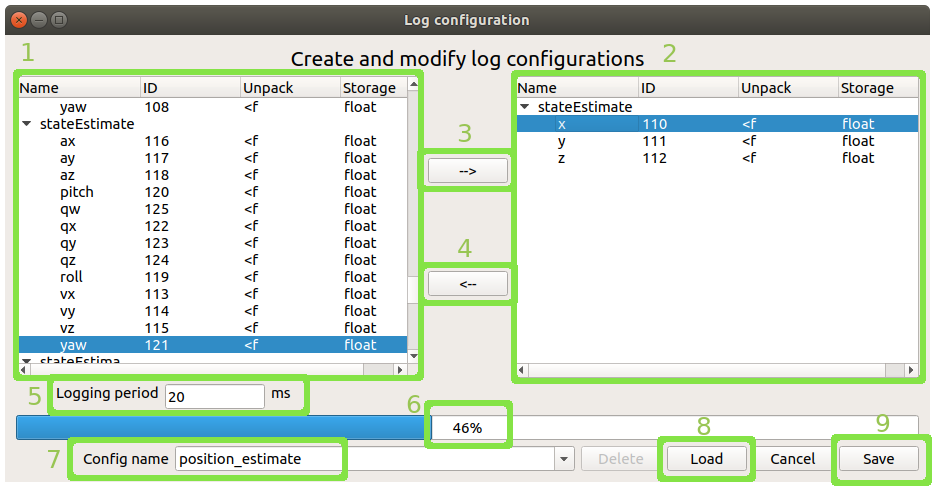
To setup a new log block click on the menu “settings/logging configuration”, You then see the following toolbox:
- List of log variable in the Crazyflie
- Log variables in the current log block
- Add the selected Crazyflie log variable in the log block
- Remove the selected log block variable from the log block
- Period at which the variables are sampled and the block is send by the Crazyflie to the client. The minimum possible period is 10ms (100Hz) and it can be set by step of 10ms up to 2550ms.
- Space taken by the variables in the log block.
- Name of the new or existing log blocks. You can choose an existing block from the list or type the name of a new one
- Load existing log block configuration
- Save log block configuration
Flight settings
By using the settings on the Flight control tab you can set things such as the max roll/pitch and thrust.
Input devices
In order to control the Crazyflie you are connected to you will need some input-device. Normally this would be a gamepad, but any input-device with at least 4 analog axis will do. Here's a list of some input-devices that are used.
In order to make sense of the input from the device a mapping has to be supplied. This mapping will convert raw axis values on the input-device to useful values like roll/pitch/yaw/thrust. There's a few default mappings shipped with the client, but it's easy to create your own.
Creating new mappings
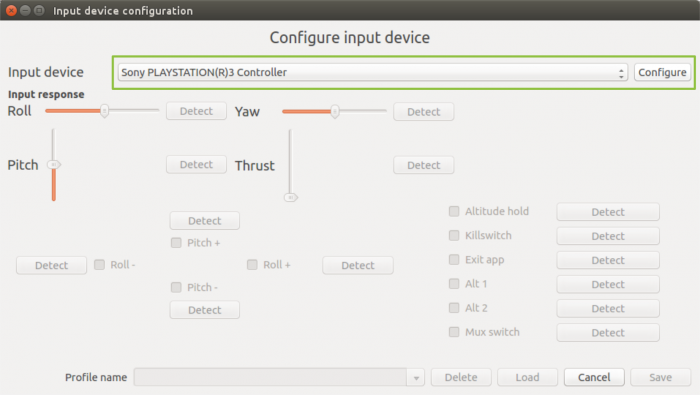
The software comes bundled with mappings for Xbox and PS3/4 controllers, but if you have another input-device then it's quick to create your own configuration. Go to the menu Input device → Configure device mapping.
Select the device you would like to configure and press Configure.
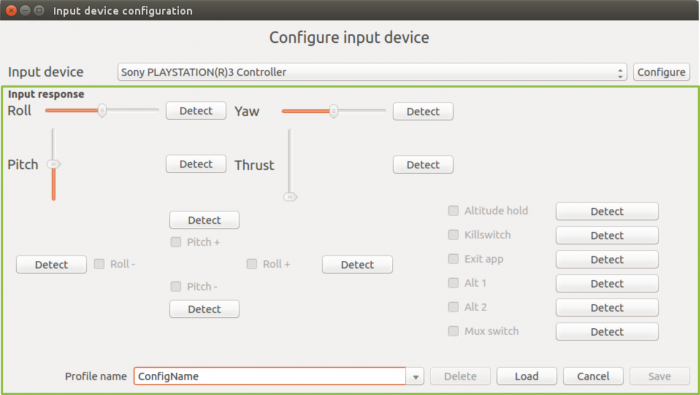
For each functionality that can be mapped there's a Detect button, by pressing it the following dialog will appear.
Follow the instructions to detect the axis or button that you would like to map to the functionality. If you would like to map the functionality to two axis (like right/left sholder-button) then select Combined axis detection and follow the instructions.
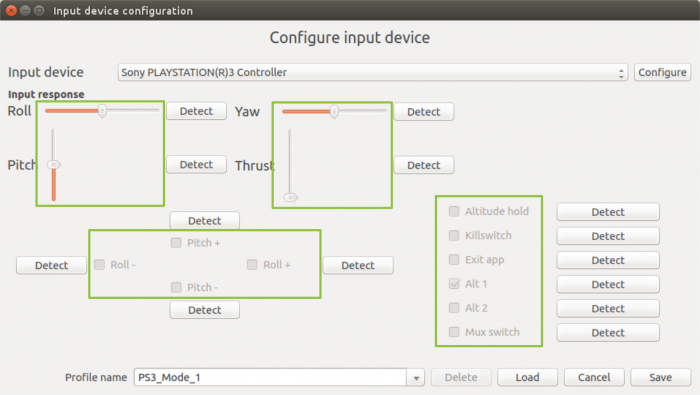
Go though all the functionality you would like to map by pressing the Detect button for each. To be able to save the mapping you will at least have to map roll, pitch, yaw and thrust.
Once you have mapped functionality you will be able to see the feedback directly in the configuration dialog (when you're not detecting a button). Make sure to check that the response is what you intended. When you are finished with the mapping then enter the map name and press save.
If you would like to start from a previous configuration and change it (either to update or to create a new one) then select the appropriate mapping in the drop-down and press Load. Once you have made the changes you would like to do then either press Save without changing the name to update the mapping or enter a new name and press Save to create a new one.
Selecting device
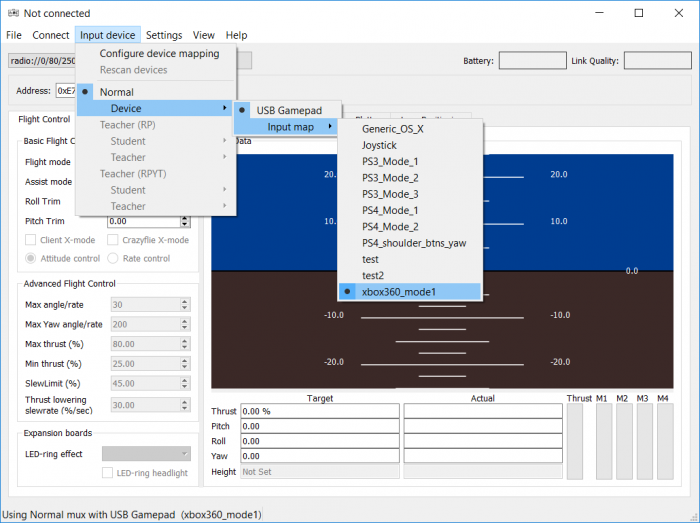
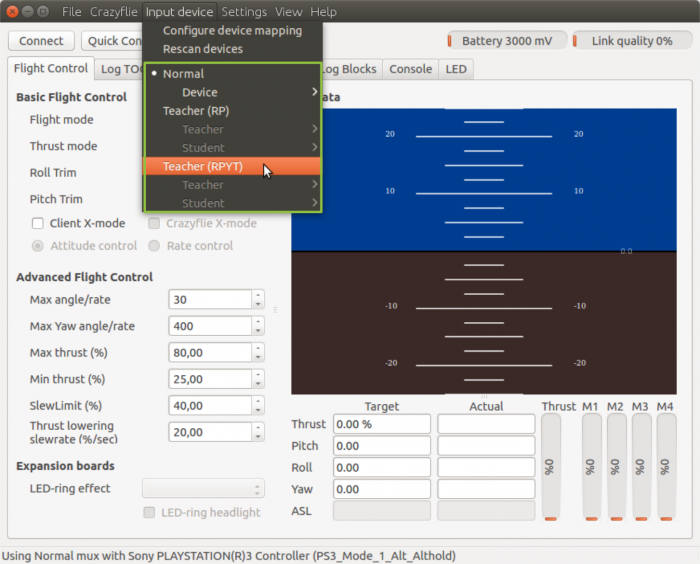
The current input device and mapping can be selected from the Input device menu.
The Input device menu contains a number of different “modes” that can be used for controlling a Crazyflie. Currently there's thee to choose from. The alternatives will only be enabled if there's enough input devices connected to use them.
- Normal: Just like it says this is the normal mode using only one controller to control a Crazyflie
- Teacher (RP): This mode requires two input-devices, where one will be configured for roll and pitch and the other one for the rest of the functionality. By using the Mux switch functionality (mapped in the configuration) the second controller can take over roll and pitch as well
- Teacher (RPYT): This mode requires two input-devices, where one will be configured for roll, pitch yaw and thrust, and the other one for the rest of the functionality. By using the Mux switch functionality (mapped in the configuration) the second controller can take over roll, pitch, yaw and thrust as well
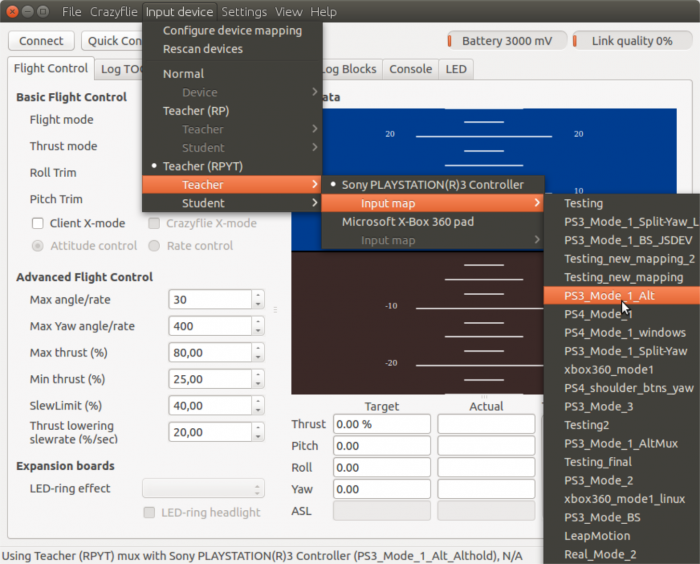
For normal usage just enter the Normal menu, select the device you would like to use and the correct mapping. As a device is selected the list of mappings are enabled.
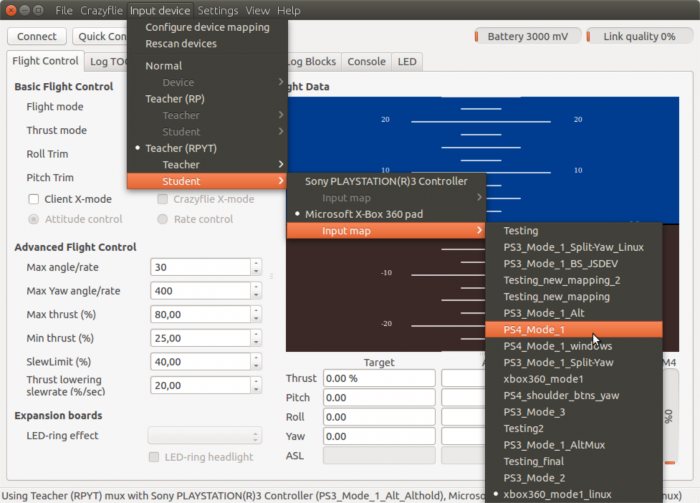
If more than one input device is connected then it's possible to switch to one of the teacher modes.
First select the device that should be used for the teacher and then it's mapping.
Then select the device that should be used for the student and then it's mapping.
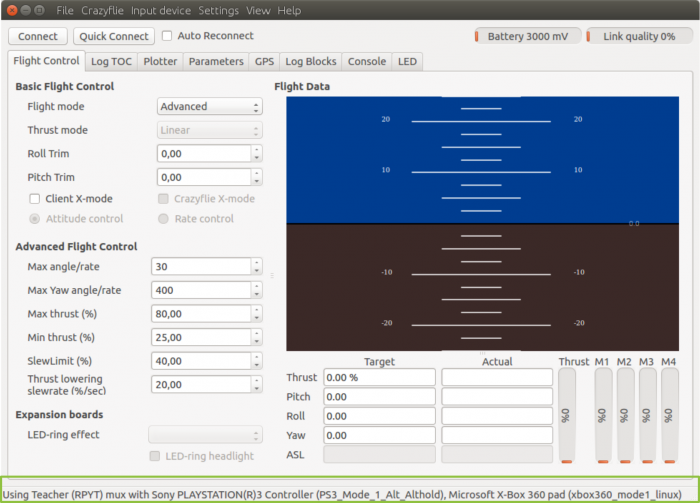
Once this is done you will be able to see the open devices and configurations at the bottom of the user interface.
Tabs
The main interface is built up of different tabs that can be shown/hidden from the View→Tabs menu.
Flightcontrol
The normal view used when flying is the one seen below.
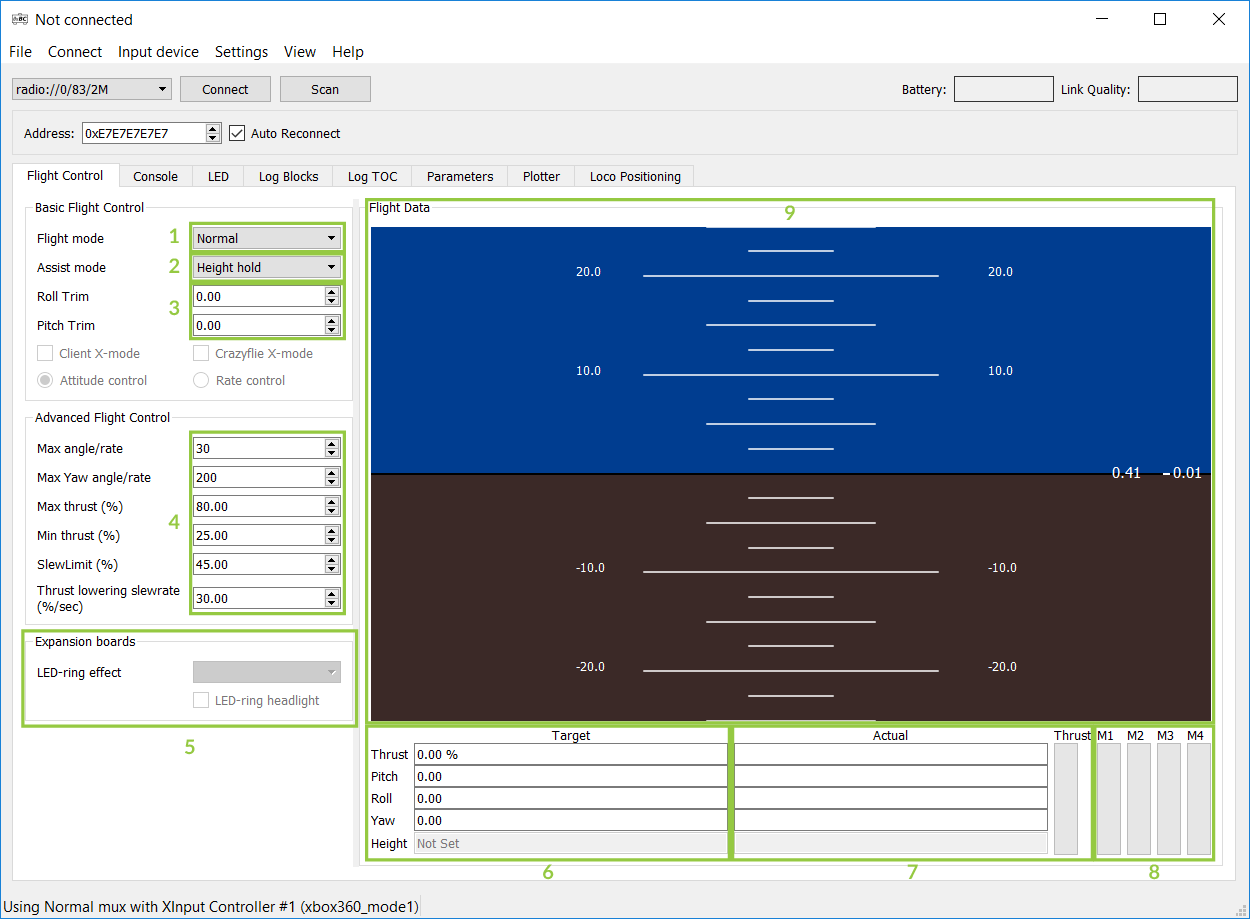
- Flight mode selector (Normal and Advanced)
- Normal: Recommended for beginners
- Advanced: Will unlock flight settings in 3
- Assisted mode selection. The assisted mode is enabled when the assisted mode button is pressed on the Gamepad.
- Altitude hold: Keeps the Crazyflie at its current altitude automatically. Thrust control becomes height velocity control.
- Position hold: Keeps the Crazyflie at its current 3D position. Pitch/Roll/Thrust control becomes X/Y/Z velocity control.
- Height hold: When activated, keeps the Crazyflie at 40cm above the ground. Thrust control becomes height velocity control. Requires a height sensor like the Z-Ranger deck.
- Roll/pitch trim can be set either in the UI or using the controller (if the correct buttons are mapped). This will offset the input to the Crazyflie for correcting imbalance and reducing drift.
- Advanced flight control settings are available if Advanced mode has been selected (settings are in %):
- Max angle: Set the max roll/pitch angle allowed
- Max yaw rate: Set the max yaw rate allowed
- Max thrust: Set the max thrust allowed
- Min thrust: Minimum thrust before 0 is sent to the Crazyflie
- Slew limit: Set the percentage where the thrust is slew controlled (the thrust value lowering will be limited). This makes the Crazyflie a bit easier to fly for beginners
- Slew rate: When the thrust is below the slew limit, this is the maximum rate of lowering the thrust
- Settings for flight decks, currently the LED-ring effect and headlights can be set (if the ring is attached)
- Target values sent from the client for controlling the Crazyflie
- Actual values logged from the Crazyflie
- Motor output on the Crazyflie
- Horizon indicator
Plotter
The plotter tab can be used to visualize data logged from the Crazyflie
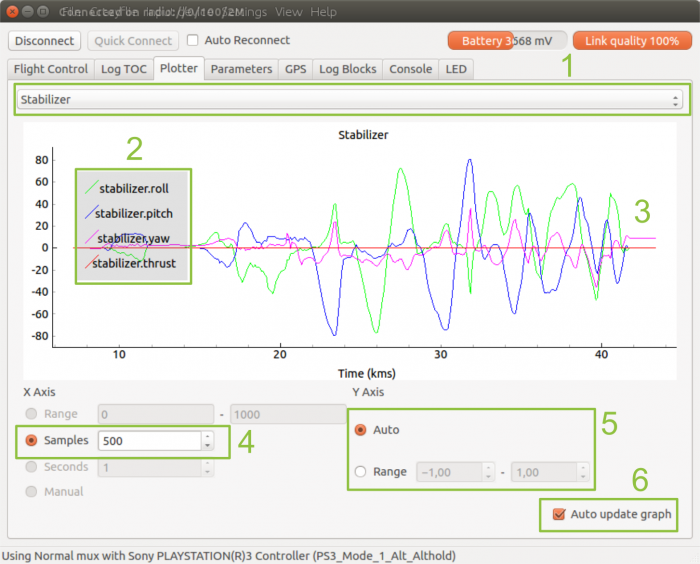
- Select logging configuration to plot. Read about how to create configurations <here>.
- Legend for the logging configuration that is being plotted.
- Logged data, zooming and panning can be done with the mouse.
- Number of samples showed in the plot. After this is filled the plot will start scrolling the data
- Auto-scaling or fixed scaling for the Y-axis
- Auto update graph. If this is disabled the plot will stop updating (but data will still be collected in the background)
Parameters
The Crazyflie supports parameters, variables stored in the Crazyflie that can be changed in real-time. The parameter tab can be used to view and update parameters. For more information about parameters see logging and parameter frameworks.
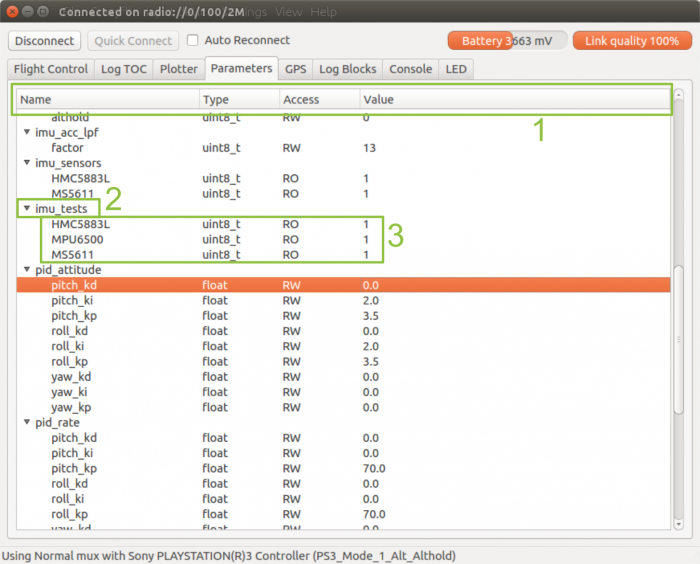
- Parameter information fields
- Name: The name of the parameter or group.
- Type: The C-type of the variable stored in the Crazyflie (you cannot set values outside this)
- Access: RW parameters can be written from the client while RO parameters can only be read
- Value: The value of the parameter
- Group: To make things easier each group has it's members organized as sub-nodes to the group
- Parameters: The full name of each parameter is the group combined with the name (group.name)
Log blocks
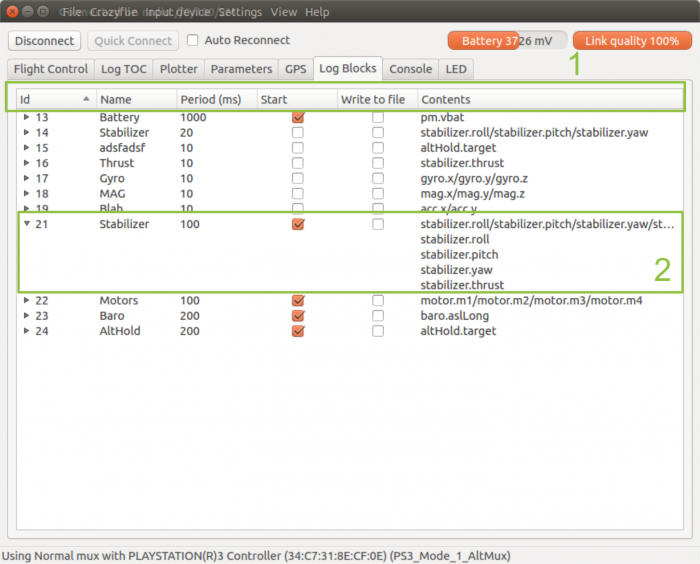
The log blocks tab shows all log configurations that are saved and if they are started. It's also possible to start/stop them as well as write the logged data to file.
- Fields
- ID: Block id in Crazyflie
- Name: Block name in client
- Period: The period of which the data is sent back to the client
- Start: Marked if started, click to start/stop block. Note that some of the blocks are used for the user interface, so if they are stopped the user interface will stop updating
- Write to file: Marked if writing to file, clock to start/stop writing. The data will be written in the configuration folder for the client (see <here> how to find it).
- Contents: The variables contained in the block (named by group.name)
- Information for log configurations are folded by group by default, opening them up will show in detail what variables are in the group
The data written to file will be in the configuration folder under logdata. Each directory is timestamped after when the client was started and each file timestamped after when the writing to file was started (i.e starting/stopping and starting/stopping again will yield two files in the same directory). The data logged to the file is in CSV format with the headers for the data at the top. A timestamp is automatically added for each entry and shows the number of milliseconds passed since the Crazyflie started (sent together with the log data).
Example data of what's logged when logging the battery level:
Timestamp,pm.vbat
9103,3.74252200127
10103,3.74252200127
11103,3.74252200127
12103,3.74252200127
13103,3.74252200127
Console
The console tab will show printouts from the Crazyflie firmware as it's running.
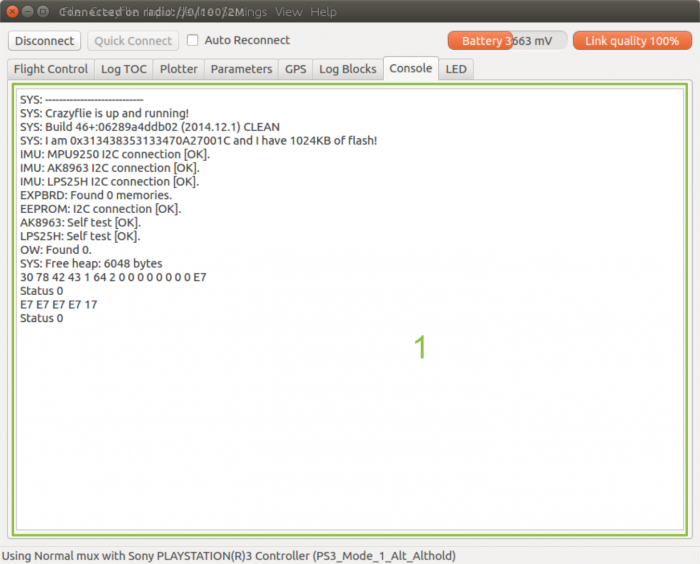
- Console output from the Crazyflie
Loco Positioning
The Loco Positioning tab shows information from the Loco Positioning system when present.
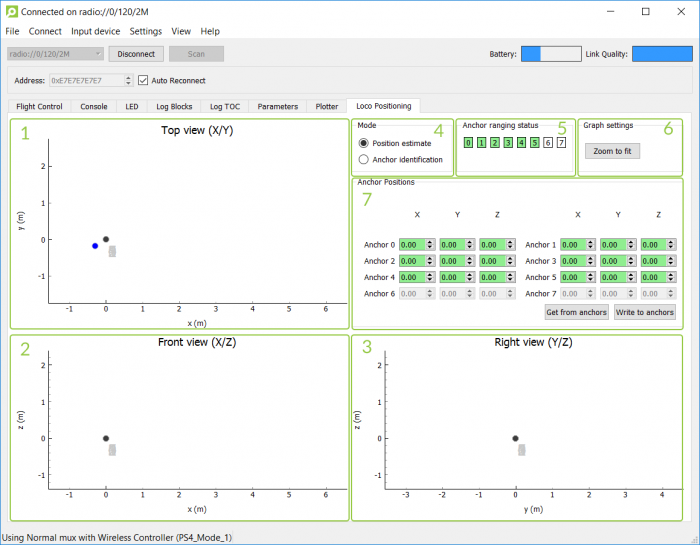
There are three graphs showing 2D projections of the system from three directions. The top left graph shows the system from above, the bottom left shows is it from the front (along the y-axis) while the bottom right shows it from the right side (along the negative x-axis). The graphs can be zoomed and scrolled.
The tab can be used in two modes that is selected with the radio buttons to the right
To setup the LPS anchor system mode (TWR or TDoA), see the Configure LPS positioning mode wirelessly documentation.
Position estimate mode
Displays the configured anchor positions and the estimated position of the Crazyflie. Can be used to make sure the system is set up correctly and that the estimated position is reasonable.
- Plot for X/Y (top view) showing anchors and Crazyflie
- Plot for X/Z showing anchors and Crazyflie
- Plot for Y/Z showing anchors and Crazyflie
- Sets the graph mode
- Position estimate - Normal viewing mode
- Anchor identification - Enhanced mode where anchor id and marker becomes larger when Crazyflie is closer
- Indicates if anchors are communicating with Crazyflie (i.e anchors are up and running)
- Fit and center all data in graphs
- Used to set anchor positions (see below)
When setting the anchor position there's three colors to indicate the status:
- White - No position exists for this anchor (i.e the position has not been read yet)
- Red - Position has been read from the anchor and it differs from the currently shown value in the input box
- Green - Position has been read from the anchor and it is the same as the currently shown value in the input box
The positions of the anchors is continuously read in the background and as positions comes in or input box values changes the colors will be set accordingly. There's also two buttons used for the settings:
- Get from anchors - Fills the input boxes with the positions read from the anchors
- Write to anchors - Writes the currently shown values in the input boxes to the anchors. In order to check that the write has been successful wait about 10s and all the fields should turn green as the positions are read back. If some of the fields are still red, try pressing the button again.
Anchor identification mode
displays the configured anchor positions. When the crazyflie is close to an anchor this is indicated in the graphs by highlighting it. This mode is useful to identify anchors and verify that the system is correctly configured.

- Plot for X/Y (top view) showing anchors and Crazyflie
- Plot for X/Z showing anchors and Crazyflie
- Plot for Y/Z showing anchors and Crazyflie
- Sets the graph mode
- Position estimate - Normal viewing mode
- Anchor identification - Enhanced mode where anchor id and marker becomes larger when Crazyflie is closer
- Current system mode indication. The system must be in TWR mode for the anchor identification mode to be available.
ZMQ backends
The UI is normally used to get/set parameters, view logged data and send control commands to the Crazyflie. Aside from this there's also the possibility to connect via ZMQ to the client and control several things:
- Parameters: Get/set parameters by name
- LED-ring memory: Write LED ring memory
- Input-device: Act as an input device
The benefit of using this approach instead of the stand-alone ZMQ server is that you will not have to take care of everything, just the parts you are interested in for the moment. An example is this video where the light/sound is controlled via ZMQ though the client, but everything else is like normal (flying, input device, etc).
