Products
-
-
- Accessories
- Breakout boards
This page has deprecated and will be archived. Please go to https://www.bitcraze.io/.
It can be used for a number of things but the primary usage is as a development platform and for quadcopter enthusiasts that would like a nano-quad. Here's a list of some possible uses:
Here's a short list of what is needed for flying:
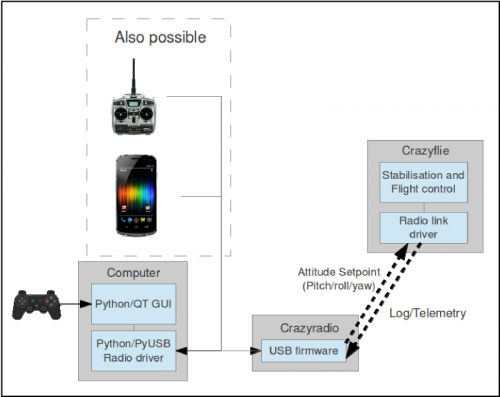
 The Crazyflie is controlled from a computer using an input device such as a game controller (PS3 or Xbox 360). A USB radio dongle is used to send control data from the controller/computer to the quadcopter.
The Crazyflie has 4 different controls: roll, pitch, yaw and thrust. Changing the roll and pitch will make the quadcopter tilt to the sides and thus change the direction that it's moving in. Tilting the quadcopter forward will make it go forward and the same applies for every other direction. Note: the images below show the front as setup in X configuration. Normal (out of the box) configuration has the front inline with motor M1.
![[yaw and "front" orientation changing] [yaw and "front" orientation changing]](/_media/projects:crazyflie:userguide:crazyflie_directions_thrust_yaw.jpg?w=250&tok=7a2f30) Changing the yaw will make the quadcopter spin. Changing the yaw is normally not a good idea for beginners since this will also change what direction is forward for the quadcopter.
Changing the yaw will make the quadcopter spin. Changing the yaw is normally not a good idea for beginners since this will also change what direction is forward for the quadcopter.
The thrust is used to control the altitude of the quadcopter.
The frequency used communication is based on 2.4 GHz. For every quadcopter it's possible to set a channel between 0-127 (only 0-80 is allowed worldwide) that will be used for communication. This means that once the channels is set for a quadcopter you will have to specify the appropriate channel when communicating with it. The channel can be set within the service tab of the Crazyflie client pc-program.
The Crazyflie is contructed without a separate frame, it uses the PCB as a frame and simply attaches four motors to it. This means that the weight of the platform is very low and on most impacts it simply bounces of objects. If you are unlucky either propellers or motors might break when crashing. If so have a look at our troubleshooting page for some basic troubleshooting and repairs. If you are very unlucky due to a severe crash you might break one of the PCB arms. We are working on a 3D printed plastic patch that could fix this. Either way handle the Crazyflie with care as it is not unbreakable
For more tips on flying take a look at the tips and tricks page.
Below are the basic components mapped out on the Crazyflie.
The Crazyflie has four LEDs mounted, two blue, one red and one green. The two blue LEDs indicate that the system is powered and the red/green shows operation.
When the Crazyflie is powered the two blue LEDs will be lit up and the red/gren LED will blink shortly indicating that the bootloader is executing. After this the firmware will start up.
During firmware startup:
When USB is connected:
When USB is not connected:
All these behaviours can be compile time configured. In the future they might as well be able configurable during runtime using the Crazyflie client.