Products
-
-
- Accessories
- Breakout boards
This is an old revision of the document!
The lighthouse deck allows to use the HTC-Vive/SteamVR lighthouse tracking system to fly Crazyflie autonomously. The easiest to get started is to have an HTC Vive VR system already up and running using Basestation V1. It is possible to setup the system with only 2 Basestation V1 and one Vive controller or tracker.
The VR computer must have Python 3 64Bit installed and in the path in order to be able to extract the base-station position. When everything is setup, steamVR and the VR computer are not required anymore: the Crazyflie will autonomously estimate its position from the lighthouse signals.
In order to setup the system you must also be able to compile a custom firmware for your Crazyflie and to program your Crazyflie 2.X. To do so you can follow the Getting started with Crazyflie 2.X and Getting started with development guides.
If you already have a setup VR system jump to the next section.
It is possible to setup the SteamVR without a Head Mounted Display (HMD). This allows to setup a minimal system with just two Base stations and one controller or tracker. It can be quite useful when a full VR system is not needed or to setup a system at fairs or conference.
Follow the guide from Triad: SteamVR Tracking without an HMD (the steps after 14 is optional). This has been tested to work on Windows, Linux and Mac.
OSX
The osx implementation seems to be a bit shaky, but it is possible to make it work. I used the “macos_beta” flavour.
The paths in the triad instructions are for Windows. On Mac OSX you will find the files to update in
/Users/<your user>/Library/Application Support/Steam/steamapps/common/SteamVR/SteamVR.app/Contents/MacOS/runtime/drivers/null/resources/settings/default.vrsettings

/Users/<your user>/Library/Application Support/Steam/steamapps/common/SteamVR/SteamVR.app/Contents/MacOS/runtime/resources/settings/default.vrsettings
For the floor to be flat, it is good to start steamVR with the controller placed on the floor. The only difference with an HMD setup is the orientation of the space: with an HMD the space will be oriented when you setup the room. Without an HMD the master base station (the one in Mode B) will be at the origin of the space. The Z axis will be the vector normal to the base station window, pointing toward the inside of the base station and rotated around X to be parallel with the floor.
Troubleshooting
If you get the following message when running the tracker_test.py script of the tutorial (step 16):
openvr.OpenVRError: b'VRInitError_Init_VRClientDLLNotFound' (error number 102)
Or this when running the script from the Crazyflie firmware repos:
$ python3 get_bs_position.py
Openning OpenVR
python3: Relink `/lib/x86_64-linux-gnu/libudev.so.1' with `/lib/x86_64-linux-gnu/librt.so.1' for IFUNC symbol `clock_gettime'
Segmentation fault (core dumped)
Then you are maybe missing some essential packages for openvr:
On Ubuntu:
$ sudo apt-get install libudev-dev  libvulkan-dev  libsdl2-dev
$ python3 -m pip uninstall openvr
$ python3 -m pip install openvr
if this still doesn't work, please check this forum-thread for other options: https://github.com/cmbruns/pyopenvr/issues/30
Troubleshooting²
When running SteamVR on Linux, by default the access right to USB device might not be configured right. If you have problem connecting the tracker/controller/HMD you can add a udev rules that gives full access to any USB Valve hardware to all users on your system:
# cat > /etc/udev/rules.d/99-steamvr.rules << EOF
KERNEL=="hidraw*", ATTRS{idVendor}=="28de", MODE=="0666"
EOF
You may need to restart SteamVR to see the connected devices.
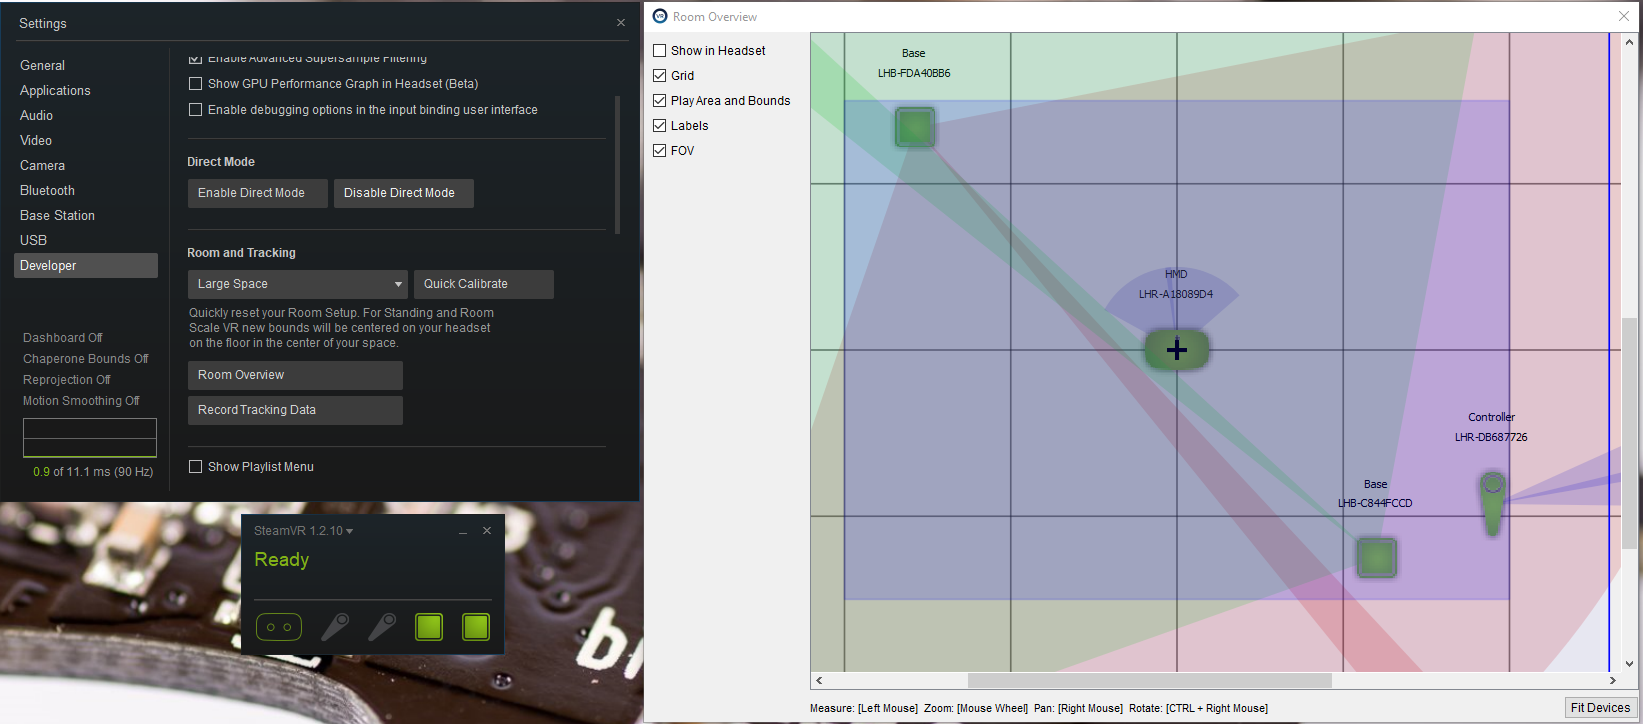
When using a full VR setup, SteamVR has a developer menu that allows to quickly and accurately setup the system origin and orientation. By default the system origin is going to be placed in the center of the playground and the orientation will depend of the shape and of where the monitor is located.
To set the orientation and origin yourself, you can go to the SteamVR settings, to the developer subscreen and you can display the room overview. Then you can place the HMD on the floor, with the front pointing at where you want the Crazyflie X axis to point, and then click 'Quick Calibrate':

Launch SteamVR and make sure at least one controller or the HMD is tracking:
Clone or download the latest version or the Crazyflie firmware on the VR computer, open a command line window and navigate to the Crazyflie firmware. There you can make sure you have the openVR python package and run the script to get the basestation position:
python3 -m pip install openvr
cd tools\lighthouse
python3 get_bs_position.py
The script will output the base-station position ready to be copy-pasted in the lighthouse deck driver:
Openning OpenVR
OpenVR Oppened
Origin: {} [0, 0, 0]
-------------------------------
{.origin = {-1.421995, 2.188835, -1.382714, }, .mat = {{-0.773449, 0.339506, -0.535269, }, {0.027097, 0.861399, 0.507206, }, {0.633280, 0.377794, -0.675447, }, }},
{.origin = {1.311097, 2.224771, 1.318952, }, .mat = {{0.641178, -0.457615, 0.616019, }, {0.029892, 0.817028, 0.575823, }, {-0.766810, -0.350791, 0.537539, }, }},
Note: If you have a setup without HMD and you want to set the origin of the space on the floor, you can open the get_bs_position.py script and modify the top of it to set “CENTER_AROUND_CONTROLLER = True”. Be aware that this will put the SteamVR and your space out of sync, so none of the example using the SteamVR coordinate will work correctly.
Copy the last two lines and, on the computer or virtual machine you use for Crazyflie development, past them in the file 'src/deck/drivers/src/lighthouse.c'. It should replace the content of baseStationsGeometry[] and the line “#define DISABLE_LIGHTHOUSE_DRIVER” should be commented to enable the driver:

// #ifndef DISABLE_LIGHTHOUSE_DRIVER
//   #define DISABLE_LIGHTHOUSE_DRIVER 1
// #endif

baseStationGeometry_t baseStationsGeometry[] = {
{.origin = {-1.421995, 2.188835, -1.382714, }, .mat = {{-0.773449, 0.339506, -0.535269, }, {0.027097, 0.861399, 0.507206, }, {0.633280, 0.377794, -0.675447, }, }},
{.origin = {1.311097, 2.224771, 1.318952, }, .mat = {{0.641178, -0.457615, 0.616019, }, {0.029892, 0.817028, 0.575823, }, {-0.766810, -0.350791, 0.537539, }, }},
};
Now that the Crazyflie firmware is modified you can save, compile and program the Crazyflie. For example this can be done from command line with:
make
make cload
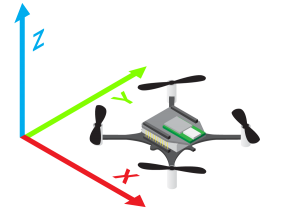
The orientation of the flying space will follow the orientation of the OpenVR space but in a more 'robotic' coordinate system (ie. Crazyflie wants Z to point up!).
The following rotation is done from the OpenVR space to the Crazyflie coordinated system:
| Crazyflie | OpenVR |
|---|---|
| X | -Z |
| Y | -X |
| Z | Y |
This allows to easily orient the Crazyflie when setting up the system with an HMD.
While the Lighthouse deck has 4 receiver and so can recover its orientation, this is not implemented yet. So, similarly to when flying in the LPS it is very important to start the Crazyflie with a correct orientation. It should be started with the antenna in the direction of X positive:

The safest way to verify the orientation of the space is to look at the estimated position. In the client you can create a new log block in “settings/logging configuration” containing “stateEstimate.x/y/z”. You can then look at it in the plotter and move the Crazyflie around to understand how is X positive oriented:
Once you have located X positive, you can test if the positioning is working by starting the Crazyflie facing X and using the clients “Position hold” mode, this should drift a little bit (mostly in Z) due to an estimator bug, though you should be able to get a quite stable flight and be able to control the Crazyflie position with the gamepad.